⚠️ Safety Notice – Reverse Cycle Air Conditioners
This equipment must only be installed, commissioned, serviced and repaired by suitably qualified and licensed personnel.
Before commencing work, complete a task-specific risk assessment and ensure electrical isolation procedures, safe access, adequate service clearances and appropriate PPE have been considered. All work must comply with applicable regulations, standards and manufacturer requirements.
Particular care must be taken when working around electrical systems, refrigerant circuits, moving parts, roof spaces, ceiling spaces, confined spaces and working-at-heights hazards where applicable.
Do not proceed if safe access, required clearances, confined space risks or appropriate safety controls cannot be achieved and maintained.
Safety takes priority over diagnosis, repairs, installation schedules and customer expectations. If the task cannot be completed safely, it must not proceed until the risks have been adequately controlled.
Braemar Split System – Evacuation Procedure (Previously Installed System)
⚠️ Safety Notice – Refrigerant Recovery, Evacuation and Charging
Servicing split system air conditioning equipment involves working with mains voltage electrical circuits and pressurised refrigerant systems.
Before commencing work:
- Isolate electrical power to both the indoor and outdoor units.
- Verify the system is safe to work on before opening the refrigeration circuit.
- Refrigerant must only be recovered, handled and charged by appropriately licensed personnel.
- Wear appropriate PPE, including safety glasses and gloves.
- Ensure the work area is adequately ventilated.
- Never use oxygen, compressed air or non-approved gases when pressure testing or servicing the system.
Failure to follow safe working practices may result in refrigerant release, equipment damage, electric shock, fire, serious injury or death.
Overview
This procedure applies to Braemar split systems that have already been installed and have been opened for repair, maintenance or component replacement.
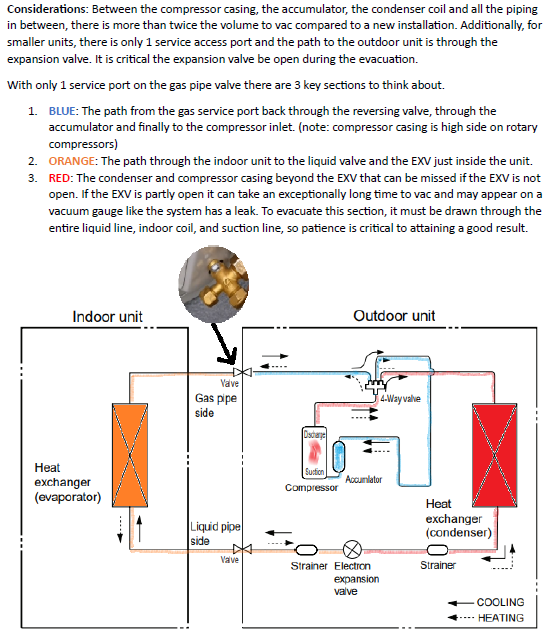
Unlike a new installation, the indoor unit, outdoor unit and connecting pipework all need to be evacuated. A proper evacuation removes air and moisture from the complete refrigeration circuit before refrigerant is charged into the system.
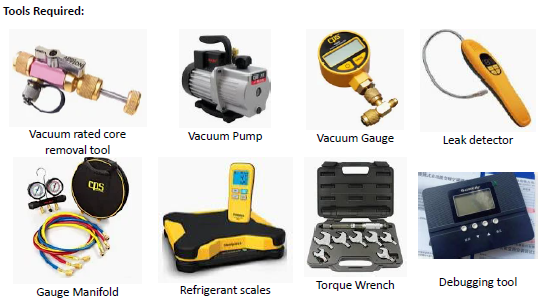
Required Equipment
- Vacuum pump with clean oil
- Micron gauge
- Core removal tool (recommended)
- Refrigerant scales
- Leak detector
- Gauge manifold (if required)
- Manufacturer-approved diagnostic tool (where applicable)
Important Precautions
- Verify all refrigerant pipe connections, flare nuts and brazed joints are secure before commencing evacuation.
- Use fresh vacuum pump oil and ensure the pump is capable of achieving the required vacuum level.
- Always use a micron gauge to verify vacuum level. Do not rely solely on vacuum pump run time.
- Where fitted, ensure the Electronic Expansion Valve (EXV) is open during evacuation using the approved diagnostic procedure.
- If the system has been open to atmosphere for an extended period, additional evacuation time may be required.
- Never release refrigerant directly to atmosphere.
- Never disconnect hoses or open the refrigeration circuit unless system pressure has been confirmed as zero.
- Always perform a vacuum decay test before charging refrigerant.
- After charging, perform a leak inspection on all refrigerant joints, service ports and valve caps.
- Ensure all service valves are returned to their correct operating position before commissioning the unit.
Evacuation Procedure
1. Prepare the System
- Confirm repairs have been completed.
- Verify all pipework and fittings are correctly installed.
- Ensure service valves are in the correct position for evacuation.
- Confirm there are no known refrigerant leaks.
2. Connect Evacuation Equipment
- Connect the vacuum pump using suitable evacuation hoses.
- Install the micron gauge directly to the refrigeration system where possible.
- Remove Schrader valve cores using a core removal tool to improve evacuation speed.
3. Open the Refrigerant Circuit
- Where applicable, use approved diagnostics to command the EXV fully open.
- This ensures the entire refrigerant circuit, including the outdoor unit, can be evacuated.
4. Evacuate the System
- Start the vacuum pump.
- Continue evacuation until the system reaches 500 microns or lower.
- Larger systems or systems exposed to atmosphere for extended periods may require additional evacuation time.
5. Perform a Vacuum Decay Test
- Isolate the vacuum pump.
- Monitor the micron gauge.
- Confirm the vacuum remains stable.
If the vacuum rises:
- Check for leaks.
- Verify all fittings and hoses are secure.
- Continue evacuation if moisture contamination is suspected.
6. Complete the Installation
Once a stable vacuum has been achieved:
- Reinstall Schrader valve cores if removed.
- Charge refrigerant in accordance with the installation manual.
- Refit all service port caps.
- Conduct a final leak inspection.
- Return all service valves to their normal operating positions.
Quick Reference
✅ Use a micron gauge.
✅ Use fresh vacuum pump oil.
✅ Remove Schrader cores where practical.
✅ Open the EXV where fitted.
✅ Achieve and hold 500 microns or below.
✅ Perform a vacuum decay test.
✅ Complete a final leak inspection.
❌ Do not rely on evacuation time alone.
❌ Do not charge a system that fails the vacuum decay test.
❌ Do not use compressed air or oxygen in the refrigerant circuit.
Expected Results
| Vacuum Result | Action |
|---|---|
| Stable at 500 microns or below | Proceed with charging |
| Slow vacuum rise | Continue evacuation and investigate moisture contamination |
| Rapid vacuum rise | Inspect for leaks or connection issues |
Summary
A successful evacuation removes air and moisture from the complete refrigeration circuit. Always verify the EXV is open where fitted, use a micron gauge to confirm vacuum level, perform a vacuum decay test, and ensure the system holds 500 microns or below before charging refrigerant.