
Braemar VRF – Error Code L7: How to Fix “No Main IDU Detected” After PCB Replacement
⚠️ Safety Notice – Reverse Cycle Air Conditioners
This equipment must only be installed, commissioned, serviced and repaired by suitably qualified and licensed personnel.
Before commencing work, complete a task-specific risk assessment and ensure electrical isolation procedures, safe access, adequate service clearances and appropriate PPE have been considered. All work must comply with applicable regulations, standards and manufacturer requirements.
Particular care must be taken when working around electrical systems, refrigerant circuits, moving parts, roof spaces, ceiling spaces, confined spaces and working-at-heights hazards where applicable.
Do not proceed if safe access, required clearances, confined space risks or appropriate safety controls cannot be achieved and maintained.
Safety takes priority over diagnosis, repairs, installation schedules and customer expectations. If the task cannot be completed safely, it must not proceed until the risks have been adequately controlled.
Applies To:
Error Code:
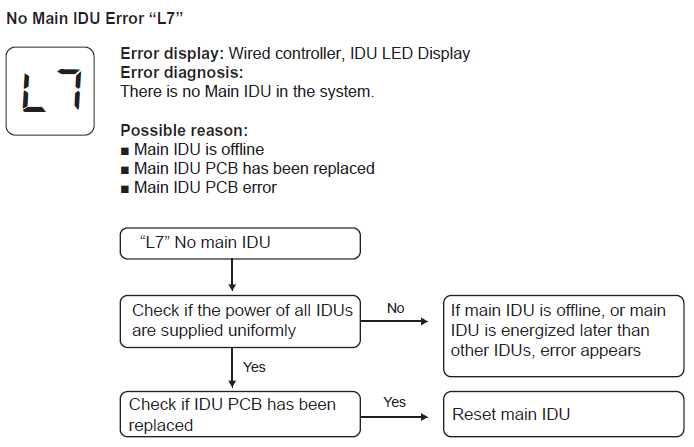
Description:
Possible Causes:
- Master IDU is offline or powered up later than other IDUs.
- Master IDU PCB has been replaced.
- Master IDU PCB error.
Symptoms:
- L7 displayed on wired wall controller or outdoor unit LED.
- System fails to operate normally after PCB replacement.
Resolution Steps:
Option 1: Assign Master IDU via Wired Controller
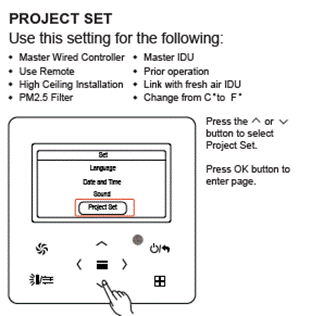
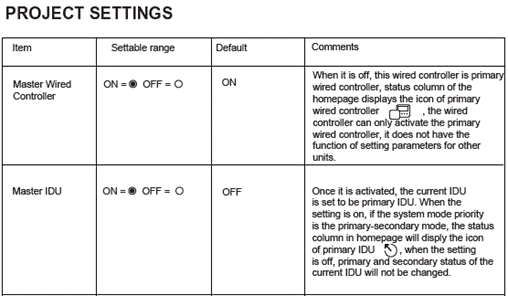
Use the wired wall controller to assign the Master Indoor Unit (available only if the system is equipped with wall controls).
- If the system has a wired wall controller, navigate to Project Settings:
- Go to Master IDU setting.
- Set ON to designate the current IDU as Master.
- Confirm and save settings.
Option 2: Re-Debug the System at Outdoor Unit
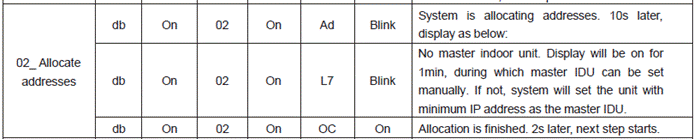
Re-run the full system debugging process at the outdoor unit, ensuring Step 2 (Auto Assign Master Indoor Unit) is completed.
- Perform full system debugging at the outdoor unit:
- Enter Debug Mode.
- The Main Outdoor PCB has either 4 or 8 buttons.
- If it’s 4 buttons, Push and Hold SW3 for 5 seconds to enter Debugging
- If it’s 8 buttons, Push and Hold SW7 for 5 seconds to enter Debugging
- Step 2 of debugging process: Auto Assign Master Indoor Unit.
- The system will allocate addresses and automatically assign the Master IDU.
- If no manual assignment occurs within 1 minute, the system will select the IDU with the lowest IP address as Master.
Troubleshooting Checklist:
- Ensure all indoor units are powered ON and energized uniformly.
- Check communication wiring between IDUs and ODU is correct and secure.
- Verify DIP switch settings on IDUs and ODU are correct.
- Inspect connectors on the replaced PCB for damage or looseness.
- If error persists after re-debugging:
- Check for faulty PCB and replace if necessary.
- Verify address allocation during debugging.
- Confirm system mode priority settings (Master/Secondary).
Additional Notes:
References:
- Service Manual – VRF Flowcharts (Section L, Page 51)
- L7 Resetting Main Board Guide