
CE52 Central Controller – Connection Wiring for Single Outdoor Unit (VRF / MCHX)
⚠️ Safety Notice – Reverse Cycle Air Conditioners
This equipment must only be installed, commissioned, serviced and repaired by suitably qualified and licensed personnel.
Before commencing work, complete a task-specific risk assessment and ensure electrical isolation procedures, safe access, adequate service clearances and appropriate PPE have been considered. All work must comply with applicable regulations, standards and manufacturer requirements.
Particular care must be taken when working around electrical systems, refrigerant circuits, moving parts, roof spaces, ceiling spaces, confined spaces and working-at-heights hazards where applicable.
Do not proceed if safe access, required clearances, confined space risks or appropriate safety controls cannot be achieved and maintained.
Safety takes priority over diagnosis, repairs, installation schedules and customer expectations. If the task cannot be completed safely, it must not proceed until the risks have been adequately controlled.
Pdf Owner's Manual CE52-24F(C)-B AU1906 attached for reference
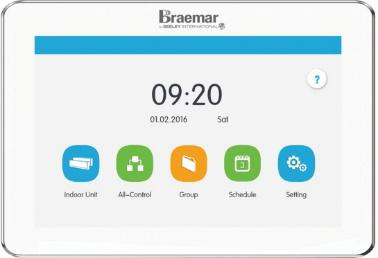 CE52-24/F9(C) - Central Controller
Purpose
This article explains how to correctly connect a CE52 Central Controller when a VRF system has ONE Outdoor Unit (ODU).
It also explains:
- What the D1 / D2 daisy chain is
- How the CE52 interacts with it
- Why two wiring options are allowed for single‑ODU systems only
What Is the D1 / D2 Daisy Chain?
- D1 and D2 are the communication terminals used to link Indoor Units (IDUs) together
- Indoor units are wired IDU → IDU → IDU in a straight line (daisy chain)
- The chain has:
- A first indoor unit
- A last indoor unit
- The last indoor unit is where controllers or termination resistors are connected
✅ This D1/D2 chain exists on all VRF systems, regardless of how many outdoor units are fitted.
⚠️ Important:
- Star or radial wiring is NOT permitted
- Communication wiring must not run from the outdoor unit to each indoor unit individually
- The D1/D2 network must always be installed in series (daisy‑chain only)
Single Outdoor Unit
✅ When there is ONE Outdoor Unit, the CE52 can be connected in either of the following ways:
- Via the Indoor Unit D1 / D2 daisy chain
- Directly to the Outdoor Unit G1 / G2 terminals
✅ Both options are valid ONLY when there is a single ODU
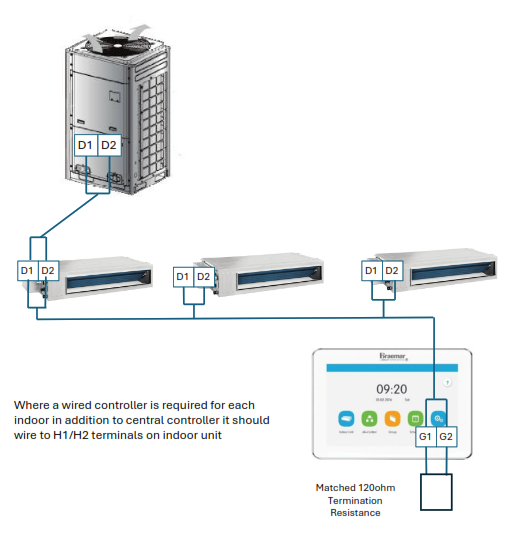
Option 1 (Most Common) – CE52 Connected to the D1 / D2 Daisy Chain
What this means:
- Indoor units are already linked together via D1/D2
- The CE52 connects to D1 and D2 on the LAST indoor unit
In simple terms:
The CE52 joins the same communication wiring that all indoor units are using.
Important points:
- The CE52 does NOT connect in the middle of the chain
- It always connects at the end
- A matching (120-ohm termination) resistor must be connected to G1 / G2 at the CE52
✅ This is the most common and simplest method
⚠️ Critical wiring rules:
- Only ONE termination resistor is permitted on the communication network
- The resistor supplied in the outdoor unit pack‑out kit must be used
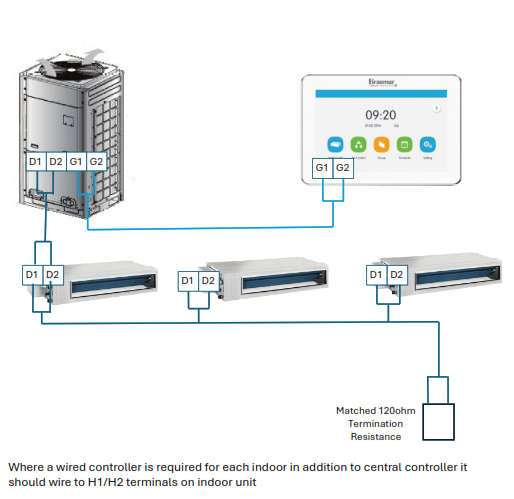
Option 2 – CE52 Connected Directly to the Outdoor Unit (G1 / G2)
What this means:
- The CE52 does not connect to the D1/D2 wiring
- It connects directly to G1 / G2 on the Outdoor Unit
⚠️ Critical clarification about D1 / D2:
- Even though the CE52 is connected to G1/G2, the indoor D1/D2 daisy chain still exists
- Indoor units MUST still be wired IDU → IDU in series
- Star configurations remain prohibited
✅ When using this method:
- The termination resistor must be installed on D1 / D2 of the LAST indoor unit
✅ This option is ONLY allowed when there is ONE ODU
Why Both Options Work (Single ODU)
With only one outdoor unit:
- The indoor (D1/D2) and outdoor (G1/G2) networks are treated as one system
- The CE52 can communicate from either end
Common Single‑ODU Mistakes
❌ CE52 connected mid‑way along D1/D2
❌ Star or radial communication wiring
❌ No termination resistor fitted
❌ Termination resistor fitted at multiple locations
❌ Communication cable screen not earthed correctly
CE52 Central Controller Connections
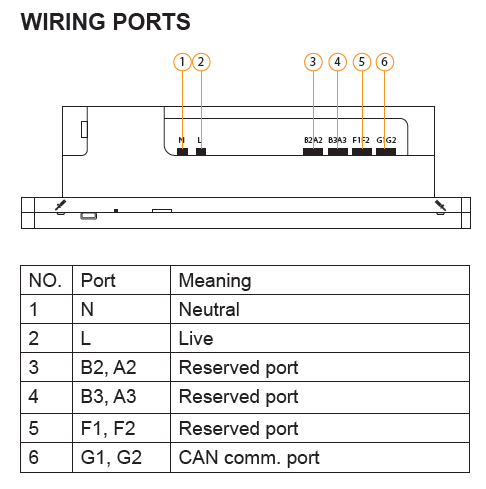
Additional Terminal Functions
F1 / F2
- Used for Fire Trip shutdown input
- Typically connected to:
- Fire Control Panels
- Commercial / industrial fire systems
Power Supply & Wiring
Installation and wiring must be done by a qualified electrician.
Power Requirements
- Uses standard household power (240 V AC)
- Works with 50 or 60 Hz
- Only use an approved 3‑wire power cable
- Cable size: 1.5 mm²
- Must meet electrical safety standards
Connecting the Wires
- Connect the communication wires to terminals G1 and G2
- Option 1 only: Fit the supplied 120 -ohm resistor across G1 and G2
- Connect Neutral to N
- Connect Live to L
- Connect Earth to the earth terminal on the metal box cover
✅ Ensure all screws and terminals are tight before power‑up
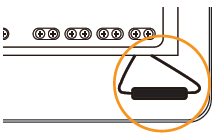
Termination Resistor – Mandatory Requirement
Resistor must be connected to G1 / G2 (Option 1)
⚠️ IMPORTANT – Option 2:
- Fit the 120-ohm termination resistor across D1 / D2 of the LAST indoor unit
✅ Every communication network gets:
- ONE termination resistor
- Fitted ONLY at the far end
- Never more than one
✅ The “far end” depends on where the CE52 is connected
Communication Cable Screen (Earth) – Critical
- Use shielded, twisted‑pair communication cable
- The cable screen (drain wire) must be:
- Earthed at ONE point only (typically at the outdoor unit)
- Do NOT earth the screen at multiple locations
⚠️ Incorrect screen earthing can cause:
- Communication dropouts
- Random indoor unit faults
- CE52 offline alarms