TQR328N / TQR428N / TQR528N Flue Reversal – OT2 Extension Loom Installation
⚠️ Safety Notice – Gas Heating Products
This appliance must only be installed, commissioned, serviced and repaired by suitably qualified and licensed personnel.
Before commencing work, complete a task-specific risk assessment and ensure gas and electrical safety requirements, ventilation provisions, safe access, adequate service clearances and appropriate PPE have been considered. All work must comply with applicable regulations, standards and manufacturer requirements.
Particular care must be taken when working around gas systems, electrical components, combustion products, hot surfaces, moving parts, roof spaces, ceiling spaces and confined spaces.
Do not proceed if safe access, required clearances, ventilation requirements, confined space risks or appropriate safety controls cannot be achieved and maintained.
Safety takes priority over diagnosis, repairs, installation schedules and customer expectations. If the task cannot be completed safely, it must not proceed until the risks have been adequately controlled.
Overview
When reversing the flue/combustion fan on Braemar TQR328N, TQR428N and TQR528N gas heaters, an OT2 extension loom must be fitted to prevent excessive tension on the over-temperature switch wiring.
The extension loom is supplied in the heater instruction kit.

Safety Information
⚠️ Installation and commissioning must only be carried out by an authorised and qualified technician.
Before starting:
- Isolate the electrical power supply to the heater.
- Isolate the gas supply to the heater.
Installation Steps
Step 1 – Reverse the Combustion Fan
Follow the heater installation manual to reverse the combustion fan.
Before repositioning the fan:
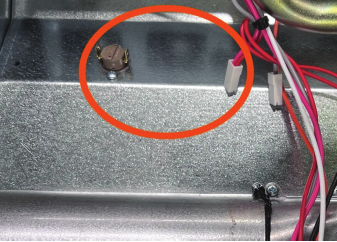
- Locate the OT2 over-temperature switch.
- Disconnect the wiring connectors from the switch to prevent strain on the wiring.
Step 2 – Install the OT2 Extension Loom
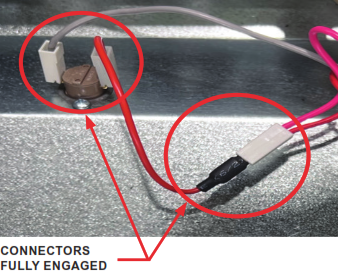
- Connect the supplied extension loom between the existing wiring and the OT2 switch.
- Ensure all connectors are pushed fully together.
- Confirm the terminals are fully engaged inside the plastic insulator.
Make sure all connections are secure before continuing.
Step 3 – Complete the Installation
- Route the wiring neatly.
- Secure the loom using cable ties.
- Ensure no wiring can contact:
- Hot surfaces
- Moving components
Once complete, continue commissioning the heater in accordance with the installation manual.
Important Notes
- This requirement applies only when reversing the combustion fan/flue arrangement on:
- TQR328N
- TQR428N
- TQR528N
- Failure to fit the extension loom may place excessive tension on the OT2 over-temperature switch wiring.
- Always refer to the heater installation manual for the complete flue reversal procedure.