
FC19 Fault Code – HX OT2 Opened
Spectrolink Reset Procedure, FC10 History Check & Overheating Diagnosis (TG, TH, THM, THM5 & THM6)
⚠️ Safety Notice – Gas Heating Products
This appliance must only be installed, commissioned, serviced and repaired by suitably qualified and licensed personnel.
Before commencing work, complete a task-specific risk assessment and ensure gas and electrical safety requirements, ventilation provisions, safe access, adequate service clearances and appropriate PPE have been considered. All work must comply with applicable regulations, standards and manufacturer requirements.
Particular care must be taken when working around gas systems, electrical components, combustion products, hot surfaces, moving parts, roof spaces, ceiling spaces and confined spaces.
Do not proceed if safe access, required clearances, ventilation requirements, confined space risks or appropriate safety controls cannot be achieved and maintained.
Safety takes priority over diagnosis, repairs, installation schedules and customer expectations. If the task cannot be completed safely, it must not proceed until the risks have been adequately controlled.
Overview
FC19 (HX OT2 Opened) indicates the secondary over-temperature safety device has operated.
FC19 does not necessarily indicate a failed component and is often caused by operating conditions rather than a component failure.
Common causes include:
- Dirty or blocked filters
- Restricted return air
- Blocked or damaged ductwork
- Fan or airflow issues
- Extended operation on low fan speeds
- Power outages or power interruptions while heating
- Previous overheating events
Before replacing any parts, check the fault history, reset the fault and investigate the cause of the over-temperature condition.
Applicable Models
- TG Series
- TH Series
- THM Series
- THM5 Series
- THM6 Series
Fault Code Summary
| Fault Code | Description |
|---|---|
| FC4 | Thermistor temperature exceeded operating limits |
| FC10 | HX OT1 Opened |
| FC19 | HX OT2 Opened |
Common Causes of FC19
Power Interruption During Heating Operation
FC19 may occur following a power outage or power interruption while the heater is operating.
If the customer reports a recent power outage, perform the FC19 reset procedure and monitor operation before replacing components.
Extended Operation on Low Fan Speeds
FC19 can occur if the heater has been operating on low fan speeds for extended periods, especially where airflow is restricted.
Check:
- Filter condition
- Return air airflow
- Outlet restrictions
- Ductwork condition
- Fan speed settings
Important: Check the fault history for FC10 faults and investigate airflow before replacing components. Many FC19 faults are caused by airflow issues rather than component failure.
Step 1 – Check Fault History
Click link to view YouTube Video - Viewing, Accessing and Clearing Fault Code History
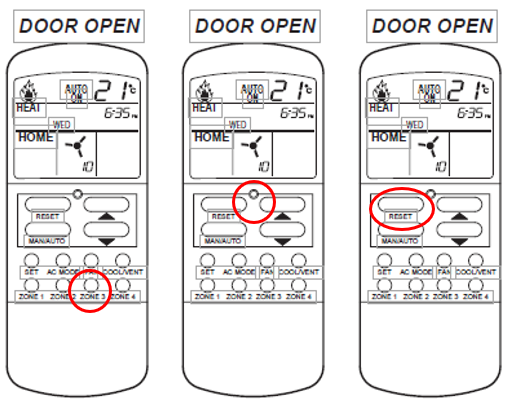
- Open the Spectrolink controller door.
- Press and hold Zone 3 until F01 appears.
- Use the up/down arrow buttons to scroll through the stored fault history.
- Record all stored fault codes.
- Check whether any FC10 (HX OT1 Opened) faults were recorded before FC19.
- Do not clear the fault history until all fault codes have been recorded.
Important: The fault history often helps identify the cause of the fault. FC10 is commonly recorded before FC19 and can indicate an airflow or overheating issue that should be investigated before replacing components.
What to Look For
| Fault Code | What It May Indicate |
|---|---|
| FC10 | Heat exchanger overheating event |
| FC19 | Secondary over-temperature device has operated |
| FC10 followed by FC19 | Often indicates an airflow or overheating issue |
| FC19 only | May be related to a recent power interruption or an over-temperature event |
Recommended Action
If FC10 is present in the fault history:
- Check filter condition
- Check return air airflow
- Check outlet restrictions
- Check ductwork condition
- Check fan speed settings
Investigate and rectify any airflow issues before considering component replacement.
Step 2 – Reset FC19 Using Spectrolink
After recording all fault codes from the fault history:
- Turn the heater OFF at the Spectrolink controller.
- Press and hold Zone 3 until F01 appears.
- Press and hold the recessed door button.
- While continuing to hold the recessed door button, press the RESET button until the spanner symbol disappears.
- Press and hold the Fan button to clear the fault code history.
- Close the controller door.
- Restart the heater and confirm normal operation.
Important: Ensure all fault codes have been recorded before performing the reset procedure.
Video Demonstration
Click link to view YouTube video- Resetting FC19 using Spectrolink controller
Step 3 – Investigate the Cause of FC10 / FC19 Faults
If FC19 returns after resetting, investigate the airflow system before replacing components.
Check the Duct Air Temperature
The SCC controller can display the temperature measured by the duct thermistor.
To view the temperature:
- Press and hold the UP and DOWN arrow buttons together for approximately 5 seconds.
- The display will show the duct air temperature for approximately 15 seconds.
- The controller will then automatically return to the normal display.
Note: On systems with multiple SCC controllers, this function is only available from the Primary SCC.
Check Airflow
Poor airflow is the most common cause of FC10 and FC19 faults.
Inspect the following:
- Return air filter clean and correctly fitted
- Return air grille free from obstruction
- Supply outlets open and unobstructed
- Ductwork not crushed, kinked or disconnected
- Fan speed set appropriately for the installation
- Airflow balanced across all outlets
Check the Installation
Verify that:
- Return air grille is correctly sized for the heater
- Sufficient outlets have been installed
- Duct sizes comply with installation requirements
- Duct bends are not excessively tight
- Long runs of undersized duct have not been used
Poor duct design or insufficient airflow can cause repeated FC10 and FC19 faults.
What to Look for in the Fault History
| Fault History | Likely Cause |
|---|---|
| FC19 only | Power interruption or isolated over-temperature event |
| FC10 followed by FC19 | Airflow restriction or overheating condition |
| Repeated FC10 and FC19 faults | Airflow, ducting or fan performance issue |
Important: If FC10 is present in the fault history, investigate airflow and ducting before replacing components. In many cases, correcting the airflow issue will prevent the fault from returning.
Common Airflow Issues
Poor airflow is one of the most common causes of FC10 and FC19 faults.
Dirty Return Air Filter
Symptoms:
- High duct air temperature
- Reduced airflow from outlets
- FC10 or FC19 fault history
Action:
- Clean or replace the filter.
- Confirm airflow improves after servicing.
Undersized Return Air Grille
Symptoms:
- No obvious duct restrictions
- Heater consistently runs hot
- Recurring FC10 or FC19 faults
Action:
- Check the return air grille size against the installation requirements.
- Increase return air capacity if required.
Too Few Supply Air Outlets
Symptoms:
- Excessive airflow from individual outlets
- High duct air temperatures
- Over-temperature faults
Action:
- Verify the number of outlets matches the heater size and fan speed setting.
Duct Restrictions
Symptoms:
- Uneven airflow throughout the home
- Reduced airflow from some outlets
- High duct temperatures
Check for:
- Crushed flexible duct
- Kinked ducting
- Excessively long duct runs
- Disconnected ducting
- Tight duct bends
Fan Speed Set Too Low
Symptoms:
- Heater operates normally for long periods before faulting
- FC10 recorded before FC19
- High duct air temperatures
Action:
- Confirm fan speed settings are suitable for the installation.
- Verify sufficient airflow is available throughout the system.
Closed or Restricted Outlets
Symptoms:
- Customer reports some outlets closed
- High duct temperatures
- Over-temperature faults
Action:
- Ensure outlets are open and airflow is evenly distributed throughout the system.
Airflow Troubleshooting Summary
If FC10 or FC19 is present:
✅ Check return air filter condition
✅ Check return air grille sizing
✅ Check outlet quantity and outlet restrictions
✅ Check ductwork for damage or restrictions
✅ Check fan speed settings
✅ Check thermistor temperature using the SCC controller
✅ Correct airflow issues before replacing components
Important: In many cases, correcting the airflow issue will prevent FC10 and FC19 faults from returning and may eliminate the need for component replacement.
THM / THM5 / THM6 Models Only – MCB Replacement Assessment
⚠️ This section applies ONLY to THM, THM5 and THM6 models.
TG and TH models do not use this MCB replacement process.
Do not replace the MCB solely because FC19 is present.
Before considering MCB replacement:
✅ Review the fault history
✅ Check for FC10 faults
✅ Perform the FC19 reset procedure
✅ Inspect and correct any airflow restrictions
✅ Verify fan operation
✅ Eliminate all overheating causes
Only consider MCB replacement if FC19 continues to reoccur after all other checks and corrective actions have been completed.
Replacing the MCB without identifying the cause of overheating may result in repeat failures.
Additional guidance on intermittent THM - FC19 Click link below to view:
Recommended Technician Actions
- Record all fault history.
- Check for FC10 faults.
- Reset FC19 using Spectrolink.
- Operate the heater and monitor performance.
- Inspect filters, ductwork and airflow.
- Correct the cause of overheating.
- For THM, THM5 and THM6 models only, assess MCB replacement if faults persist.
Quick Reference
| If You Find | Action |
|---|---|
| FC19 only | Reset fault and monitor operation |
| FC10 and FC19 | Investigate airflow and overheating issues |
| Repeat FC19 on THM / THM5 / THM6 | Investigate MCB after all overheating causes have been eliminated |