
Commissioning / debugging process of a SCHV20-24D3S
⚠️ Safety Notice – Reverse Cycle Air Conditioners
This equipment must only be installed, commissioned, serviced and repaired by suitably qualified and licensed personnel.
Before commencing work, complete a task-specific risk assessment and ensure electrical isolation procedures, safe access, adequate service clearances and appropriate PPE have been considered. All work must comply with applicable regulations, standards and manufacturer requirements.
Particular care must be taken when working around electrical systems, refrigerant circuits, moving parts, roof spaces, ceiling spaces, confined spaces and working-at-heights hazards where applicable.
Do not proceed if safe access, required clearances, confined space risks or appropriate safety controls cannot be achieved and maintained.
Safety takes priority over diagnosis, repairs, installation schedules and customer expectations. If the task cannot be completed safely, it must not proceed until the risks have been adequately controlled.
Apply 3 phase power to the outdoor unit for a minimum of 1 hour prior to commencing the commissioning procedure as below.
The lower the ambient temperature the longer the power needs to be applied prior to commissioning.
Remove the electrical service panels to expose the main PCB.
NOTE: Live wires are present, and one needs to proceed with extreme caution.
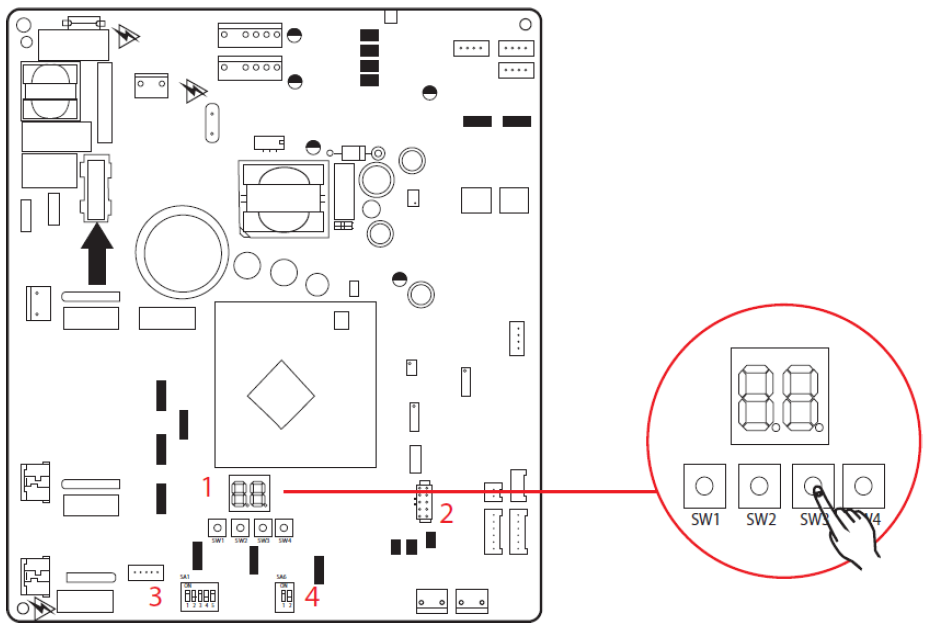
1. Indicator of main PCB (digital display tube) “LED 1” complete with four push buttons below, SW1, SW2, SW3 & SW4

2. Jumper cap “JUMP1”, the actual jumper cap number varies from unit to unit.
3. “SA1” represents unit capacity and should not be adjusted.
4. “SA6” represents a function not applicable and should be set at “00”
Commissioning:
1. “LED1” will display “A0” – this indicates the unit is waiting for commissioning
2. Press and hold “SW3” for 10 seconds to start the commissioning process
a. “LED1” will alternate between “01” and “03”
b. Press “SW3” whilst “03” is on display to confirm
3. The unit will continue through its self-diagnosis checks until “08” is displayed.
a. Press “SW3” to confirm pre-heat time has been satisfied
4. “LED1” will display “09” the unit will check the fan motors and compressor of the outdoor unit, this can take approximately 3~5 minutes.
5. “LED1” will alternate between “01” and “0F” to indicate commissioning is complete
6. System can now be operated from wired wall control to ensure fan settings and refrigerant charge are correct.
Regards
Seeley International
Technical Support
Phone:1300 650 399
Seeley Service Web Resource is for suitably qualified personnel only and contains a large library of Seeley International Service/Installation/Technical/Training and Spare parts information. Follow the link https://www.seeleyinternational.com/login/ to register
Spare Parts Identification follow the link https://spares.seeleyinternational.com/parts