
XE71-42/G Wired Controller Timer Functions Guide
One Time Timer | Daily Timer | Weekly Timer | Two-Week | Count Down Timer
⚠️ Customer Safety Notice
This article contains general information intended for homeowners and occupants.
Installation, servicing, repairs, electrical work, gas work and refrigerant-related work must only be carried out by appropriately qualified and licensed personnel.
Before performing any checks or maintenance, ensure the equipment is switched off and safe to access. Do not remove covers, enter roof or ceiling spaces, work at heights or attempt repairs unless you are qualified to do so.
If in doubt, contact an authorised service agent or licensed tradesperson. Safety must always take priority.
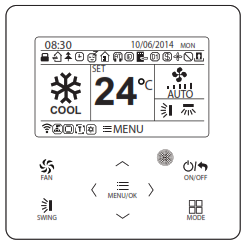
TABLE OF CONTENTS
- XE71-42/G Wired Controller Timer Functions Guide
- Most Common Timer Issue: SCH Must Be Set to ON
- Overview
- One Time Timer
- Daily Timer
- Weekly Timer
- Two-Week Timer
- Count Down Timer (Timer ON / Timer OFF)
- Holiday Function (Not a Timer)
- Troubleshooting Guide
- Quick Checklist
- Related Articles
Overview
The XE71-42/G wired controller includes five timer functions that allow your heating or cooling system to operate automatically according to your schedule. The controller supports: One Time Timer, Daily Timer, Weekly Timer, Two-Week Timer and Count Down Timer (Timer ON / Timer OFF).
Back to top
One Time Timer
Allows a single ON or OFF event to occur once at a specified time.
Example:
- Turn the system ON at 5:30 PM for a special event.
- Once completed, the timer does not repeat automatically.
Daily Timer
Repeats the same schedule every day.
The Daily Timer allows up to 8 programmable schedule periods per day.
Weekly Timer
Allows different schedules to be programmed for different days of the week.
Each day can contain up to 8 programmable schedule periods.
Two-Week Timer
Allows separate schedules for Week 1 and Week 2.
Ideal when occupancy patterns change every second week.
Count Down Timer
Allows the system to automatically switch ON or OFF after a selected period.
The controller supports:
- Timer ON
- Timer OFF
Both Timer ON and Timer OFF can be used at the same time.
Back to top
Before Setting Any Timer
Before configuring any timer function, ensure:
✅ The controller date is correct
✅ The controller time is correct
✅ The correct day of the week is displayed
✅ The system is operating in the required mode (HEAT or COOL)
The controller allows either a 12-hour or 24-hour clock format.
Related Articles
- XE71-42/G Wall Controller – Setting Date & Time
- XE71 Wall Controller Changing Language – KDHV and Dominator
Back to top
Most Common Timer Issue: SCH Must Be Set to ON
In our experience, the majority of XE71 timer enquiries are caused by schedules being programmed correctly but the SCH setting being left OFF.
The Daily Timer, Weekly Timer and Two-Week Timer all contain an SCH column that enables or disables individual schedule periods.
A schedule can have a valid time and temperature entered, but if SCH is set to OFF, the controller will completely ignore that schedule.
Example
| SCH | Time | Temperature | Result |
|---|---|---|---|
| ON | 5:30 AM | 22°C | Schedule operates |
| OFF | 8:00 AM | 20°C | Schedule ignored |
| ON | 10:00 AM | 18°C | Schedule operates |
| ON | 4:00 PM | 20°C | Schedule operates |
| OFF | 10:00 PM | 16°C | Schedule ignored |
In the example above, only the schedules with SCH set to ON will operate.
Important: Entering a time and temperature does not automatically activate that schedule. SCH must also be set to ON.
How to Check SCH Settings
- Press MENU
- Select TIMER
- Select DAILY, WEEKLY or TWO-WEEK
- Move to the SCH column
- Check each schedule period
- Change any required periods from OFF to ON
- Press MENU/OK to save
Example of a Fully Enabled Daily Schedule
| SCH | Time | Heat Temperature |
|---|---|---|
| ON | 5:30 AM | 22°C |
| ON | 8:00 AM | 20°C |
| ON | 10:00 AM | 18°C |
| ON | 4:00 PM | 20°C |
| ON | 10:00 PM | 16°C |
Tip: If a timer appears correctly programmed but is not operating, check the SCH column first.
Back to top
Understanding How XE71 Timers Work
This is another area that often causes confusion.
The timer schedules contain:
- SCH
- Time
- ON/OFF selection
- Cooling temperature
- Heating temperature
within each schedule period.
In simple terms, the controller follows the operating conditions programmed into each schedule period.
For most customers, it is easiest to think of the timer as automatically adjusting the programmed operating settings throughout the day according to the schedule you have entered.
Back to top
One Time Timer
Best For
A single event that only needs to occur once.
Example
You would like the system to start automatically before guests arrive.
- Current time: 2:00 PM
- One Time Timer: 5:30 PM
The controller will perform the timer event once only.
To Configure
- Press MENU
- Select TIMER
- Select ONCE
- Set the required hour and minutes
- Press MENU/OK to save
Back to top
Daily Timer
Best For
Customers who want the same schedule every day.
Capacity
The controller supports up to 8 schedule periods per day.
Example Schedule
| SCH | Time | Heat Temperature |
|---|---|---|
| ON | 5:30 AM | 22°C |
| ON | 8:00 AM | 20°C |
| ON | 10:00 AM | 18°C |
| ON | 4:00 PM | 20°C |
| ON | 10:00 PM | 16°C |
To Configure
- Press MENU
- Select TIMER
- Select DAILY
- Select the required schedule period
- Set SCH to ON
- Enter the required time
- Enter the cooling or heating temperature
- Repeat for additional schedule periods
- Press MENU/OK to save
Back to top
Weekly Timer
Best For
Different schedules on different days of the week.
Capacity
The controller supports up to 8 schedule periods per day, for every day of the week.
Example
| Day | Schedule |
|---|---|
| Monday-Friday | Morning and evening heating schedule |
| Saturday | Later start time |
| Sunday | Reduced operation |
To Configure
- Press MENU
- Select TIMER
- Select WEEKLY
- Select the day to be programmed
- Enter the required schedule
- Press MENU/OK to save
- Repeat for other days as required
Back to top
Two-Week Timer
Best For
Properties that operate on alternating fortnight schedules.
Capacity
The controller supports separate schedules for:
- First Week
- Second Week
with up to 8 schedule periods available each day.
Example
Week 1
- Full weekday heating schedule
Week 2
- Reduced occupancy schedule
The controller automatically follows the programmed two-week cycle.
To Configure
- Press MENU
- Select TIMER
- Select TWO-WEEK
- Select First Week or Second Week
- Program the required days and schedules
- Save the settings using MENU/OK
Back to top
Count Down Timer (Timer ON / Timer OFF)
The Count Down Timer allows the system to turn ON or OFF after a selected delay period.
The manual refers to these functions as:
- Timer ON
- Timer OFF
Both can be used simultaneously.
Timer OFF Example
Current time: 6:00 PM
Timer OFF: 3 Hours
Result:
The system automatically switches OFF at approximately 9:00 PM.
Timer ON Example
Current time: 4:00 PM
Timer ON: 2 Hours
Result:
The system automatically switches ON at approximately 6:00 PM.
To Configure
- Press MENU
- Select TIMER
- Select TIMER ON or TIMER OFF
- Adjust the required hours
- Press MENU/OK to save
The controller adjusts the timer in 0.5-hour increments.
Back to top
Holiday Function (Not a Timer)
The Holiday Function is frequently confused with a timer but is actually a separate controller function.
Holiday Function:
- Is only available in HEAT mode
- Maintains a temperature of approximately 8°C
- Is intended to help protect a property while unoccupied
- Disables normal temperature adjustment while active
This function is useful when leaving the property unattended during colder periods.
Back to top
Troubleshooting Guide
Timer Does Not Operate
Check:
- SCH is set to ON
- Controller time is correct
- Controller day is correct
- Required mode is selected
- Settings have been saved using MENU/OK
Time and Temperature Are Displayed but Nothing Happens
Check the SCH column.
A timer period with SCH OFF will be ignored by the controller.
Some Schedules Work but Others Do Not
Compare the SCH settings for each schedule.
Only schedules set to ON will be used.
Timer Operates at the Wrong Time
Check:
- Current controller time
- Current date
- Current day
- 12-hour or 24-hour clock selection
Refer to:
XE71-42/G Wall Controller – Setting Date & Time
Timer Settings Cannot Be Changed
The XE71 includes a lock function that can prevent changes being made to controller settings, including timer programming.
If the controller will not allow you to edit timer settings, check whether any lock functions have been enabled.
How to Check the Lock Settings
- Press MENU
- Select LOCK
- Review the available lock options:
- Mode Lock
- Temperature Lock
- Fan Speed Lock
- Key Lock
- Check whether any of these functions are set to ON.
How to Unlock the Controller
- Press MENU
- Select LOCK
- Use the ▲ / ▼ buttons to select the lock option.
- Use the ◄ / ► buttons to change the setting from ON to OFF.
- Press MENU/OK to save the changes.
Key Lock Enabled
If Key Lock has been enabled, the controller buttons may appear unresponsive and settings cannot be changed.
The manual advises that when keys are locked, all keys cannot be operated after returning to the previous screen.
Signs a Lock May Be Enabled
- Timer settings cannot be edited.
- Temperature cannot be adjusted.
- Fan speed cannot be changed.
- Operating mode cannot be changed.
- Controller buttons appear unresponsive.
Still Unable to Change Timer Settings?
Check:
✅ Key Lock is OFF
✅ Mode Lock is OFF
✅ Temperature Lock is OFF
✅ Fan Speed Lock is OFF
✅ Changes are being saved using MENU/OK
If timer settings still cannot be modified after unlocking the controller, refer to the owner's manual
Back to top
Quick Checklist
Before requesting assistance, confirm:
✅ Controller time is correct
✅ Controller date is correct
✅ Correct day is displayed
✅ Correct operating mode is selected
✅ Required schedule periods have SCH set to ON
✅ Times have been entered correctly
✅ Temperatures have been entered correctly
✅ Changes have been saved using MENU/OK
✅ Controller lock functions are not preventing changes
Quick Tip: If the schedule appears correct but is not working, check the SCH column first. This is the most commonly overlooked setting.
Back to top
Related Articles
XE71 Owner's Manual
Wired Controller XE71 - XE71-42G-A Owner's Manual
Date and Time Setup
XE71-42/G Wall Controller – Setting Date & Time