
Braemar XE7C-24/HC Wired Wall Controller – Operation, Wi-Fi Setup and User Guide - XE7C24-01-A
⚠️ Customer Safety Notice
This article contains general information intended for homeowners and occupants.
Installation, servicing, repairs, electrical work, gas work and refrigerant-related work must only be carried out by appropriately qualified and licensed personnel.
Before performing any checks or maintenance, ensure the equipment is switched off and safe to access. Do not remove covers, enter roof or ceiling spaces, work at heights or attempt repairs unless you are qualified to do so.
If in doubt, contact an authorised service agent or licensed tradesperson. Safety must always take priority.
Overview
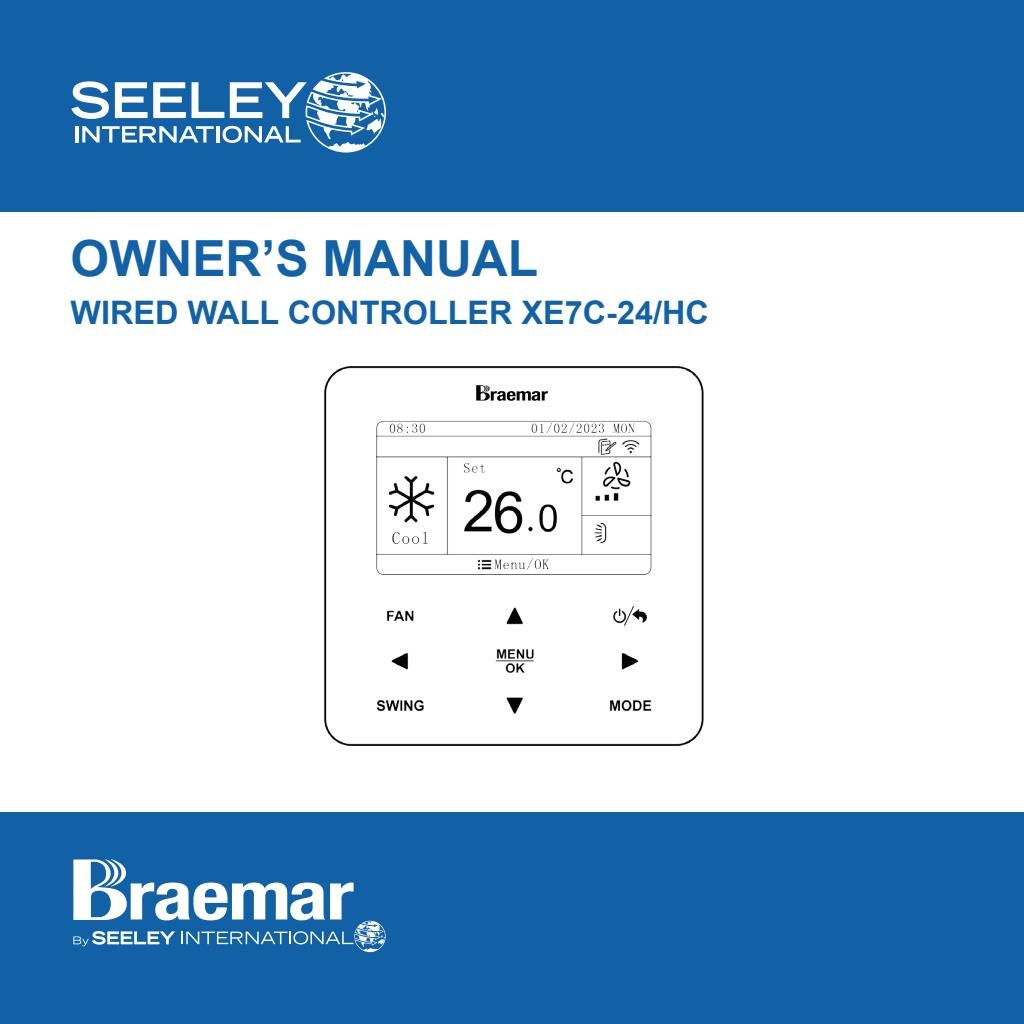
The Braemar XE7C-24/HC wired wall controller is used to operate compatible Braemar ducted reverse-cycle air-conditioning systems.
This controller may be supplied:
- As a standalone replacement or accessory
- With compatible Braemar Ducted systems
- With compatible Braemar Dominator systems
The same controller instructions apply across these applications. Some functions shown in the controller menu may not be available on every air-conditioning system.
Controller Display
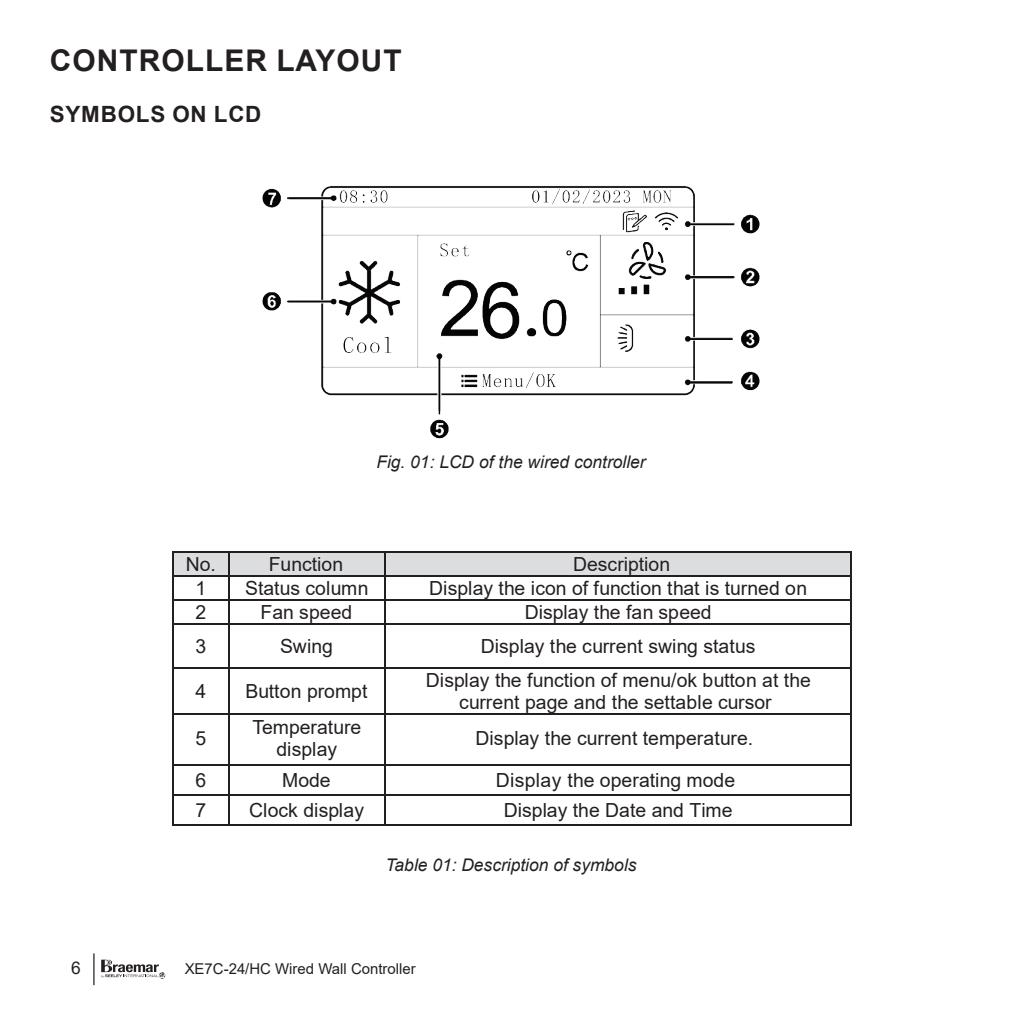
The main controller screen shows:
- Active function icons
- Fan speed
- Swing status, where applicable
- Menu and button prompts
- Set temperature
- Current operating mode
- Date and time
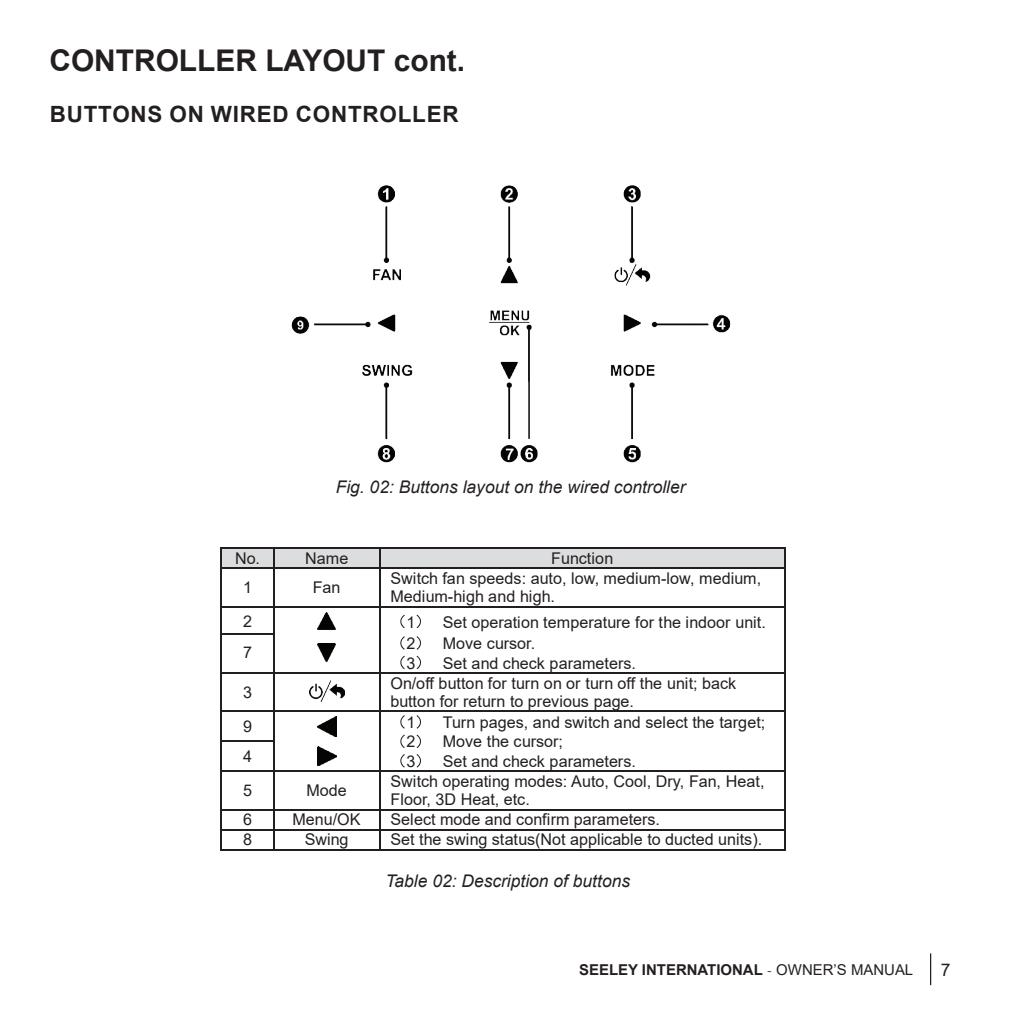
Controller Buttons
| Button | Function |
|---|---|
| FAN | Changes the fan speed |
| ▲ / ▼ | Adjusts the temperature, moves through menus and changes settings |
| On/Off / Back | Turns the air conditioner on or off and returns to the previous screen |
| ◀ / ▶ | Moves through menu selections and changes settings |
| MODE | Selects the operating mode |
| MENU/OK | Opens menus, confirms selections and saves settings |
| SWING | Adjusts swing settings where supported |
The Swing function is not applicable to ducted systems.
Turning the Air Conditioner On or Off
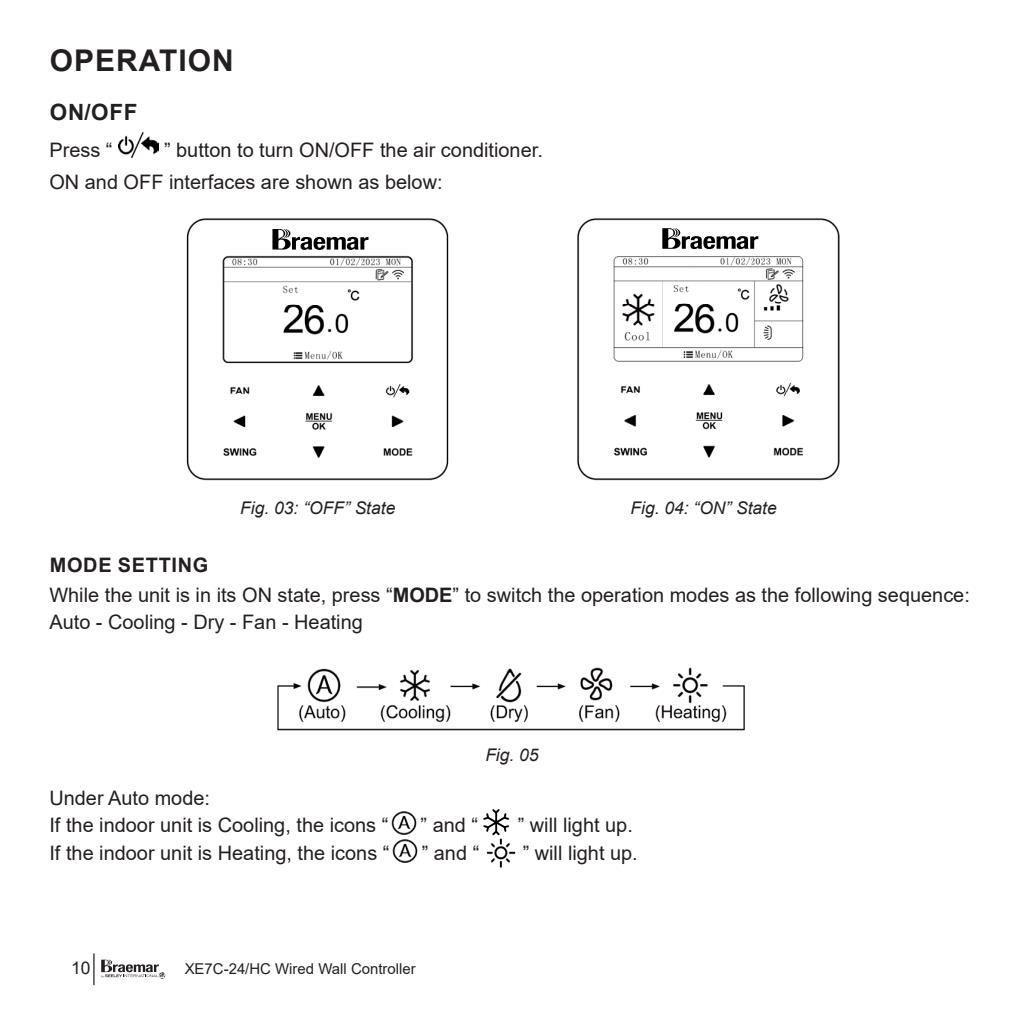
Press the On/Off button to turn the air conditioner on or off.
When the system is operating, the display shows the selected mode, set temperature and fan speed.
Selecting an Operating Mode
With the air conditioner turned on, press MODE to move through the available operating modes:
- Auto
- Cooling
- Dry
- Fan
- Heating
In Auto mode, the controller displays whether the system is currently heating or cooling.
Adjusting the Temperature
With the system turned on:
- Press ▲ to increase the set temperature.
- Press ▼ to decrease the set temperature.
- Press and hold either button to adjust the setting more quickly.
The controller may be configured to adjust the temperature in increments of either 0.5°C or 1°C. Temperature adjustment may be restricted while certain energy-saving or special operating functions are active.
Changing the Fan Speed
Press FAN while the system is operating to move through the available fan speeds.
Depending on the connected system, the available settings may include:
- Auto
- Low
- Medium-low
- Medium
- Medium-high
- High
When Auto fan is selected, the system automatically adjusts the indoor fan speed based on operating conditions. In Dry mode, the fan speed is set to low and cannot be adjusted.
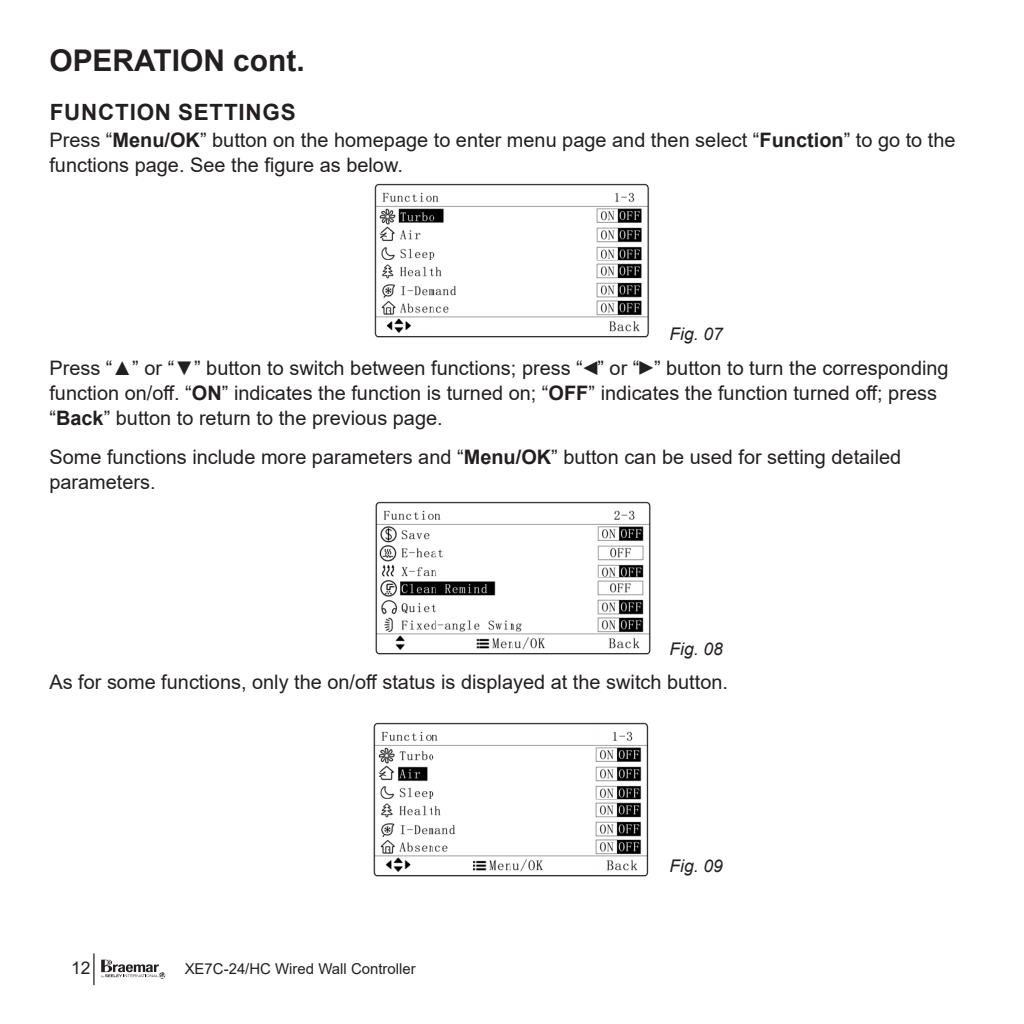
Accessing Controller Functions
To access the additional controller functions:
- Press MENU/OK from the home screen.
- Select Function.
- Use ▲ or ▼ to move through the function list.
- Use ◀ or ▶ to turn the selected function on or off.
- Press MENU/OK where additional settings are available.
- Press Back to return to the previous screen.
Only functions supported by the connected air-conditioning system will operate.
Common Controller Functions
Depending on the connected system, the controller may display the following functions.
Turbo Fan
Turbo Fan operates the system at a higher fan setting to help the room reach the selected temperature more quickly.
It is available when the system is first turned on in Cooling or Heating mode. Pressing FAN from the home screen cancels Turbo Fan and returns the controller to Auto fan.
Sleep
Sleep mode operates the system using a preset sleep temperature pattern.
When Sleep is active, Quiet or Auto Quiet mode is also activated. Sleep is not available in Auto, Fan or Floor Heating modes.
I-Demand
I-Demand operates the air conditioner in an energy-saving mode. This function is available in Cooling mode where supported by the connected system.
Absence
Absence mode is used during Heating operation to maintain the indoor temperature so the system can provide faster heating when normal operation resumes.
Save
Save mode allows operating temperature limits to be set. These limits can help prevent users from selecting temperatures outside the preferred operating range.
Quiet
Quiet mode reduces the indoor fan speed to lower operating noise.
Auto Quiet automatically adjusts the fan speed according to the room temperature and reduces the fan speed after the set temperature is reached.
Clean Reminder
The controller can track the system’s accumulated operating time and display a reminder when the return-air filter is due for cleaning.
When the reminder appears, select Done or Skip. This clears the displayed reminder and restarts the accumulated operating-time count.
Auto Clean
Where supported, Auto Clean helps dry or clean the indoor heat exchanger.
Auto Clean can only be started while the air conditioner is turned off. During operation, the controller may show a flashing Auto Clean icon and the remaining cleaning time. The manual recommends using this function when the room is unoccupied.
Setback
Setback operation maintains the indoor temperature between configured upper and lower limits while the air conditioner is otherwise turned off.
The system can automatically heat when the room temperature falls below the lower limit or cool when it rises above the upper limit.
Important: Function availability depends on the connected air-conditioning system. Some functions displayed or described in the controller manual may not apply to ducted installations.
Setting the Child Lock
To turn the Child Lock on or off:
- Open the controller’s Settings menu.
- Use ▲ or ▼ to select Lock.
- Use ◀ or ▶ to turn the lock on or off.
When Child Lock is active, the other controller buttons are disabled. Follow the on-screen instructions to unlock the controller.
Link to useful article - XE7C-24/HC Wired Controller | Child Lock (Key Lock) Function
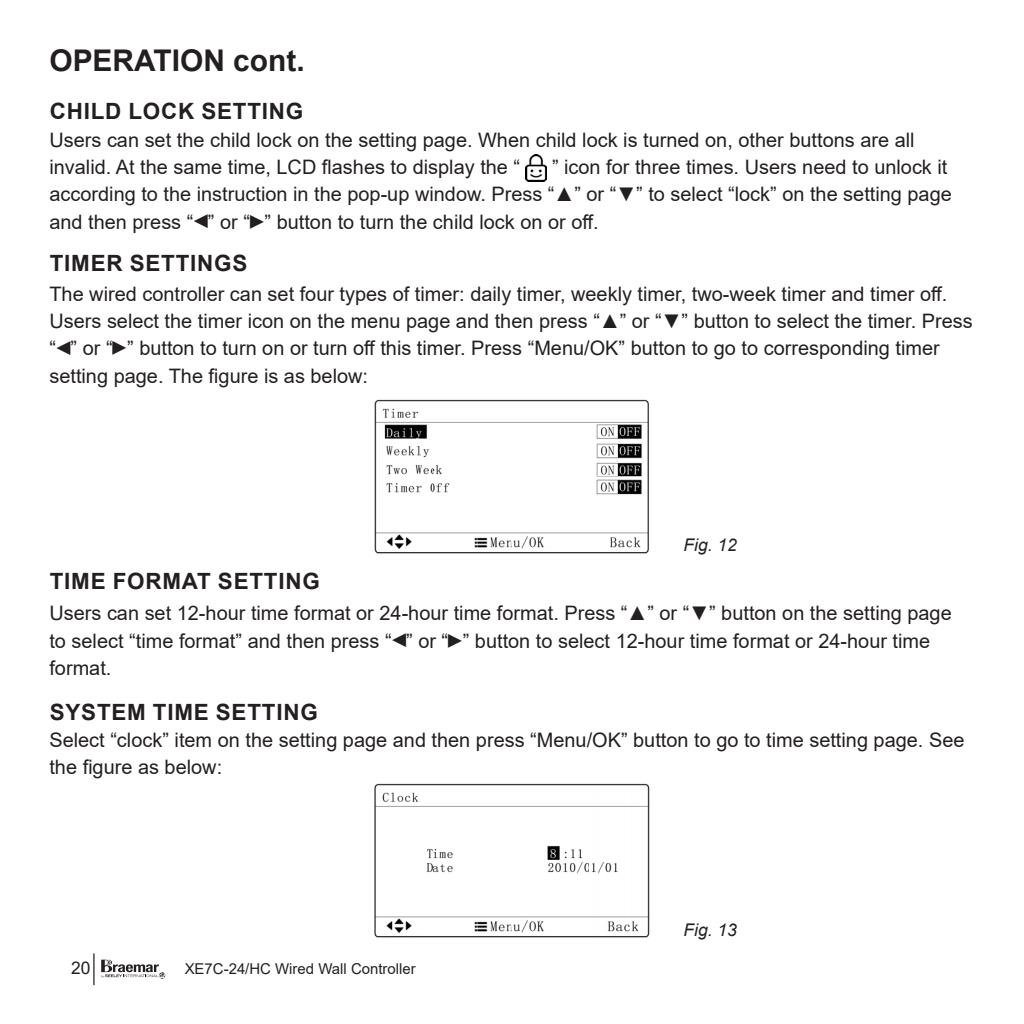
Setting the Clock
To set the controller’s date and time:
- Open the Settings menu.
- Select Clock.
- Use ◀ or ▶ to move between the hour, minute, year, month and day.
- Use ▲ or ▼ to change the selected value.
- Press MENU/OK to save the settings.
The controller can display time in either 12-hour or 24-hour format.
Setting a Timer
The wired controller supports:
- Daily timer
- Weekly timer
- Two-week timer
- Timer Off
To access the timer settings:
- Press MENU/OK.
- Select the Timer icon.
- Use ▲ or ▼ to select the required timer.
- Use ◀ or ▶ to turn the timer on or off.
- Press MENU/OK to open and change the timer settings.
Daily Timer
The Daily Timer provides four independent periods. Each active period can include:
- Start time
- On or off command
- Operating mode
- Set temperature
- Fan speed
Weekly and Two-Week Timers
The Weekly Timer provides up to four timer periods for each day of the week.
The Two-Week Timer provides up to four periods per day across a repeating two-week schedule. Make sure the controller is set to the correct current week when using the two-week schedule.
Timer Off
Timer Off automatically turns the air conditioner off after the selected number of operating hours. The time can be adjusted in 0.5-hour increments.
Link to useful article - XE7C-24/HC Timer Setup Guide | Daily Timer, Weekly Timer, OFF Timer & Two-Week Timer
Connecting the Controller to Wi-Fi
The controller uses the Ewpe Smart app for compatible Wi-Fi operation.
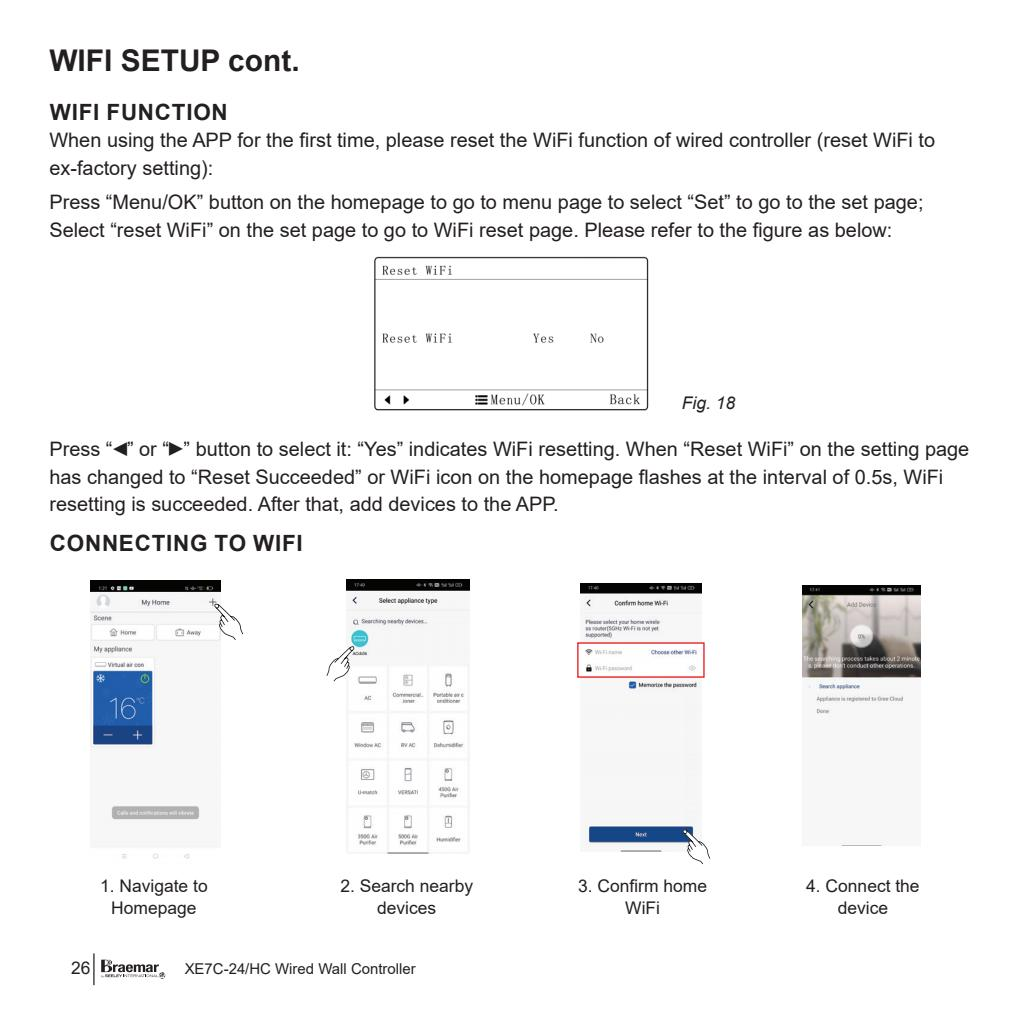
Reset the Controller’s Wi-Fi
Before adding the system to the app for the first time:
- Press MENU/OK.
- Select Set.
- Select Reset WiFi.
- Select Yes.
- Wait until Reset Succeeded appears or the Wi-Fi icon begins flashing.
- Open the Ewpe Smart app and add the device.
Add the Device in the App
Follow the app prompts to:
- Open the app home page.
- Search for nearby devices.
- Select and confirm the home Wi-Fi network.
- Connect the air conditioner.
Wi-Fi availability depends on the controller and connected system configuration.
Filter and Routine Maintenance
The return-air filter should be checked and cleaned at least every two weeks while the air conditioner is being used. Restricted airflow can reduce performance and increase operating costs.
The homeowner should also:
- Keep the outdoor unit’s air inlet clear of grass, leaves and debris.
- Arrange regular servicing in accordance with the owner’s manual.
- Keep service and maintenance records.
- Retain the owner’s manual, warranty documentation, proof of purchase and installation compliance certificates.
Maintenance involving refrigerant, electrical components or internal system components must be completed by an appropriately qualified and licensed technician.
Troubleshooting
The air conditioner will not start
Check:
- Whether power is available
- Whether a circuit breaker has operated
- Whether the selected temperature is appropriate for Heating or Cooling mode
- Whether a timer or controller lock is active
If the system still does not operate, contact an authorised service provider.
Cooling or heating performance is reduced
Check that:
- The return-air filter is clean
- The outdoor unit is clear of leaves and other debris
- The doors and windows are closed
- The operating mode and temperature are correctly selected
A room that is particularly hot or cold may take some time to reach the selected temperature.
The controller displays an error code
If the system detects an abnormal operating condition, the controller’s temperature display will flash and show an error code.
Record the complete error code before contacting an authorised service provider. Do not attempt internal electrical or refrigeration repairs unless appropriately qualified and licensed.
The system will not restart immediately
After the compressor stops, it may be prevented from restarting for approximately three minutes. This is a normal compressor-protection function.
The indoor fan stops during Cooling mode
When the room reaches the selected temperature, the compressor stops. The indoor fan may stop approximately 60 seconds later and restart with the compressor when cooling is required again.
Clicking, hissing or refrigerant-flow sounds
Low hissing, clicking or squeaking sounds may occur as refrigerant flow changes or system components expand and contract with temperature changes. These sounds can occur during normal operation.
Important Safety Information
- Do not operate the controller with wet hands.
- Do not allow liquid to enter the controller.
- Do not install the controller in a damp location or in direct sunlight.
- Do not attempt to install, remove or repair the controller yourself.
- Refrigeration and electrical work must only be performed by appropriately qualified and licensed technicians.
- Children must be supervised to ensure they do not play with the appliance or controller.
Further Information
For complete operating instructions, function descriptions, error-code information and maintenance requirements, refer to:
Braemar XE7C-24/HC Wired Wall Controller Owner’s Manual
Document number: XE7C24-01-A